Project Organization - The Garage

Happy Tuesday!

It's been a while since my last post, very long actually, so I decided to end the hiatus today and give my little blog some much needed attention.  And what better way to come back than with a project organization post, right?  I have been on an organizing kick lately and I have been loving it!  I'm not sure about you but I find it somewhat therapeutic. Well, except for bathrooms.  Yeah, never been a fan of cleaning bathrooms, but it's still gotta be done. 

Now, onto the subject at hand.

My husband and I had the brilliant idea of cleaning out our garage this past weekend.  Awesome idea because our garage was a total mess (I have pictures to prove it), but that is where the awesomeness stops because we just about melted during the process.  Okay, that is a tad bit dramatic but it sure felt like it.  

This is what we were working with...terrible, I know.  Just a side note, this is not a reflection of the rest of the house. Just in case you were wondering, haha! :)


It looks like a dumping ground...this is real life.  No staging required here. :)


Confession - the one thing I wished we had in this house is a two car garage.  It's challenging only having one, especially when one has a manual transmission and I still don't know how to operate it.  Another thing to add to my bucket list.  haha


We purchased our shelving unit from The Home Depot for around $77.00.  It was fairly easy to put together once we figured it out, but in our defense, those instructions were terrible!  We will definitely add more storage space in the near future once I do some additional rearranging and decluttering.  I would even like to paint the garage to get rid of those ugly white stripes.


It took us a few hours but this is what it looks like now.   So much better!


The arrows are pointing to items that will be either donated, sold at a the next yard sale, or disposed of.  This will give us even more room!  Now, I have to find out how to dispose of electronics because we have a box full of gadgets, batteries, and cords that we have collected over the years.


Here is a close up.  The storage unit itself seems very sturdy.  According to the box, this unit can hold up to 4000 pounds and I know we are nowhere near that number. I plan on adding some pretty labels to the existing bins and purchasing a few more.  There is so much potential!


Another item checked off our "to do" list.  This little project has sparked a new interest, and I can't wait to start working on a few more ideas I have for this space. 

Do you have any tips for keeping your garage organized?  If you do, please feel free to share them in the comment section below. 

I hope you enjoyed this post and thank you so much for stopping by!

Until next time.
Karina

NEW: FUJI FILM instax mini 8

It's been too long SUNFLOWERS
How are all of you for the longest time?
I hope you all had a fun and great summer. To be honest, I am actually deadly sick and sadly... I lost my voice too so no videos at the moment either cause I can't do any voice overs. I did buy a new toy/camera for myself and it was worth it because I am really in love with it.

Here is my Lovely New Camera

So this camera comes with all this in this little box.


 The instructions on how to fix, how to put the film in, and not only that, helps with the lighting on how to work the flash and everything. I actually had to read and understand how each flash works before using the camera at all. It is really helpful and useful. You may have to fully read through 1-2 of the papers.

Not only that, the camera does not come with film so you will have to purchase that separately. The color of the camera is actually a pastel yellow. The other colors besides the black and white are all pastel if the color is solid. There are many other designs but you have to order them online from special sites and the may be priced high. Just depends on where you purchase it. I bought mines at Urban Outfitters and it was priced... "OKAY" I guess. It was about $117USD after tax which turned out to be a great investment. Film on the other hand, You can purchase there for like $30USD at Urban Outfitters for but I get mines from Walmart for about $17 for 2 packs. Each packs comes with 10 film. Unless you want the fancy colors, nice frames, and more, I suggest buying them online for cheaper.

This is how the inside looks like along where the battery place is.


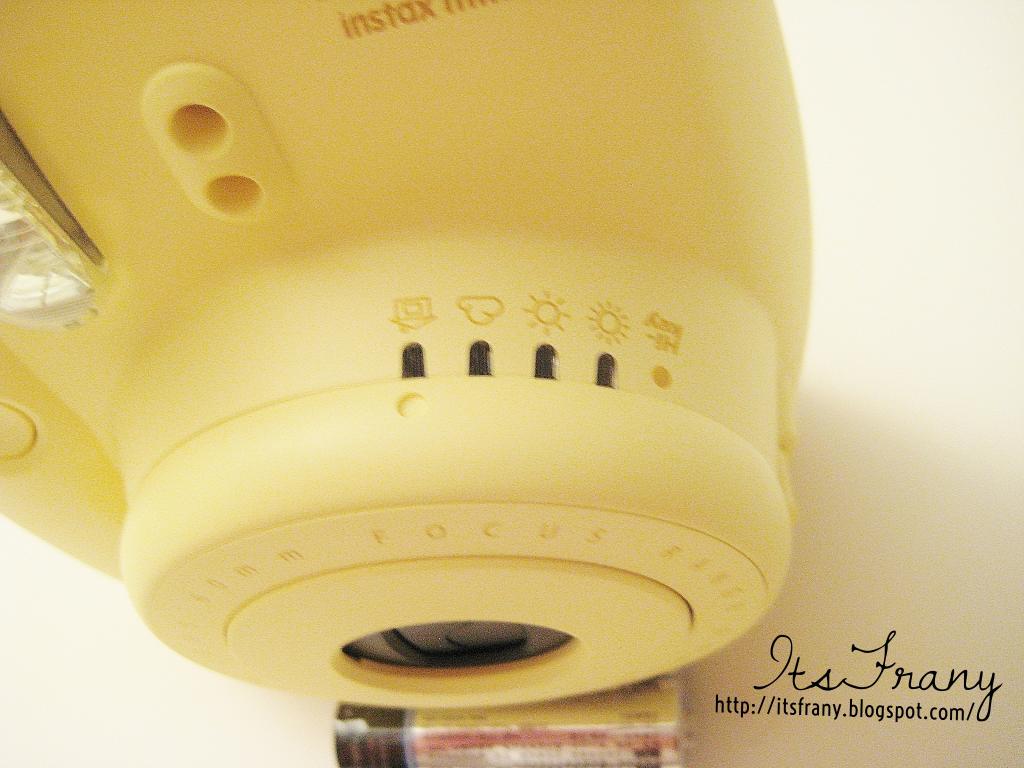
This photo shows the different types of settings of light you may get. Depending on the day, you have to use a different setting. Yes, It does make a BIG difference because it helps with how the picture may turn out to look. Especially the weather and if you are indoor somewhere. There is instructions on how each one works and it is a MUST to read it for sure!!!

Overall.... I love the camera!! 
It is very usefully, easy carrying but the only down fall about it is that it does get dirty easily so you may want to buy a separate case of possibly get a little carry bag to out in your purse or backpack. I have not had it long enough to take it with me on a vacation spot but I will let you know for sure when I do.


Thank You all for Reading!!
I will post more when I can and hopefully I will.
My YouTube is getting sad and lonely without new videos so I should do that too...


Thank You all for the Support!!

SEE YOU ALL IN MY NEXT POST!!!

A Little Hallway Project

Hi Everyone!

I hope you all are having a fantastic week thus far.  My week has gone by so incredibly fast that I cannot  believe the weekend is just around the corner (not complaining).  The only aspect of this weekend I'm not thrilled about is the weather.   Can you believe it will be 100+ degrees both days! Crazy. 

It's funny how seasons are consistent, yet every summer I'm astonished at how hot it gets every. single. time. Well, onto more exciting news.

I found some adorable white frames a couple of weeks ago while perusing the isles of Home Goods that I wanted to share with you.  Now that our home is beginning to take form (style wise), I've been making more of a conscious effort to add more family/vacation pictures around my home.  I don't plan on adding too many - just a few to add that special touch.  It's interesting how I always manage to find the cutest things while on my lunch break.  By the way, my husband fears the words "oh, I'm just out and about killing time during my lunch" ;)

Once I got home from work the search began for that perfect spot.  I quickly realized that finding the perfect spot wasn't going to be the challenge, but rather getting them leveled and spaced just right without leaving a gazillion nail marks.  Has that happened to you?  Please say yes, I'll make me feel better.

I decided to hang them on the left side of this wall - as you can see, it looked pretty plain before.  For a moment (or more like an hour, really), I contemplated getting a third frame but decided against it and just leave it as is for now.


To prevent leaving this wall scarred like I have so many, I finally decided to put into practice a tip I saw on t.v. a long time ago and most recently on Pinterest.  Why I never tried this is beyond me as it could have saved so many walls.


Tools used: nails, hammer, leveler, paper (8.5 x 11) and tape


Can you see a partial face here?  It's just missing the smile.


I first marked the paper and then hammered the nail into place.


Used my leveler to ensure both frames were straight.

How cute is this little girl?

As you can see, it was quite easy to do and it worked like a charm.  Now for the really difficult part, finding what two pictures to print from the many we have taken over the years.


This was a small project but I feel the hallway looks so much better.  Now on to the next project!

Until next time and thank you so much for reading.

Karina